Saturday, December 28, 2013

Night Stands

After I finished the armoire, the little IKEA nightstands we had gotten after the fire looked so puny and white, which is kind of strange for me to be saying since my go-to color for painted furniture has always been white.  Although recently I've been painting stuff blue, so who knows anymore?
 
Anyway, we had a pair of unfinished chest-of-drawers that at one time were our night stands, and I was going to paint them white, but somehow that never happened.  After we started our addition and had to cram our bed into the porch room, there was no longer room for these, and eventually they ended up being stored out in the unfinished addition, which meant that they were not in the fire.
 
So they've been sitting up in the purple room all this time since we've been back in our house, and now that we have a big old brown armoire in our temporary bedroom it seemed like the thing to do would be to stain these things to match.  So I did.  I used the General Finishes Gel Stain, started with "Georgian Cherry" so that it would have a red undercurrent like the armoire did, and then over top of that I put "Antique Walnut" followed by a few coats of satin finish wipe-on polyurethane, and here's how it turned out:
 

I've been dying to use these handles that came with our kitchen cabinets (which we ended up not using) for something in our house, but everything else I've done recently looked better with knobs.  You can't really see them in the photo above, so here's a close-up:


This staining business has turned into a disease.  Next I want to make a headboard and stain it, since apparently I'm actually capable of doing this sort of thing.  Ughh..... I absolutely HATE getting all yucky and dirty and sanding things and getting stuff all over my hands - HATE IT!!!  And yet I'm sitting here thinking of more things to do.  Well it's fun to see the end product so hopefully my luck will hold out and I'll end up with a nice headboard too!  Stay tuned...

Wednesday, December 18, 2013

An Armoire!

I had secretly been hoping, for several years, to eventually find an affordable antique armoire to use as a linen closet since we somehow neglected to include one in our house plans, probably because the house didn't have one before.

So about six weeks ago, one magically appeared in a thrift store for an extremely low price.  Since that time it's been mostly out on the back porch where I have been working hard to sand all of the dirt and cooties and paint splatters off of it, and to let it air out.  I also thoroughly cleaned it with mineral spirits.  Old furniture sort of creeps me out because of the potential for old mildew smells and the smells of people I'm not related to, but I've always liked the idea of it, and I love how it looks.  So I decided to suck it up and get over the ick factor and make this potentially beautiful piece of furniture my own.  Fortunately it had no mildew smell whatsoever, and no cigarette smell either, and none emerged.

When it got cold we brought it inside and I've been busy refinishing it ever since.  As I was working on it I started thinking about who might have owned it and how such a magnificent piece of furniture had ended up in a thrift store after all these years.  I started concocting various scenarios based on what I smelled and what I saw as I was working on it.  And now that it is back in a caring home I feel like I am a part of its history too.

The first smell that emerged as I was sanding it was kind of a perfumey rose scent.  It was pretty disgusting.  When we bought it I told Doug that if it ended up smelling any kind of way that I found to be intolerable, we were going to have to get rid of it.  I'm really sensitive to certain odors and it's kind of a random assortment - I never know what's going to set me off.  So when I first got a whiff of the rosy smell I immediately thought that someone had sprayed something in there to mask some other more icky smell.  That didn't turn out to be the case, so I moved on to the idea that it was the perfume in the clothes of some nice old lady from the 1930s or 40s who was using the armoire to store things, rather than as an active day-to-day closet.  And I was okay with that.  I imagined that she lived in a nice old house in a pleasant neighborhood.  I think I was definitely tilting in the direction of my grandmother's house in my various imaginings.

There were tiny white paint spatters all over the outside, as if somebody had been painting their ceiling with a roller and hadn't bothered to cover it up the armoire to protect it from the paint.  I thought maybe it had been passed along to an unappreciative daughter or son, or grandchild, who didn't care whether it got messed up.  And later they couldn't sell it because it was so beat up and had those paint spatters on it, and then it was so huge that it wouldn't fit in the next place they moved to, so they just dropped it off at the thrift store.

By that time I was feeling really sorry for it, with its sad history of abuse and neglect.  And I was also becoming more attached to it as I attempted to bring it back to its former glory, hoping that it would feel better after I finished making it look good.  There's something about grooming an old piece of furniture or an old instrument or an old anything - once you start taking care of something you start to care about it more than you otherwise might.

I got one additional whiff of something or other when I started polyurethaning the inside, in my attempt to seal in all the cooties, so that I wouldn't have to worry about the germs of a stranger anymore.  It had stopped smelling at all, so I was feeling really hopeful that it would work out for me.  Suddenly, I guess from the wetness of the polyurethane, another kind of sweet smell emerged that sort of reminded me of unsmoked pipe tobacco.  So there was a husband using this armoire too!  He probably hung his suits in there after smoking his pipe down in the parlour, maybe with a packet of pipe tobacco still in his jacket pocket.  He was probably using it before his wife did, because her scent went away with the first sanding, and his got activated afterwards by the polyurethane.

And now there's no more smell because the polyurethane has dried and sealed everything in.  That's kind of sad in a way, but now I'll be able to enjoy this beautiful and useful piece of furniture for the rest of my life.

I forgot to take a "before" picture, so all you'll get to see is how it looks now.  It was a lighter color, more reddish, and really beat up.  I used the leftover stain from my parents kitchen cabinets to get it to the color I wanted and then gave it two coats of polyurethane, so it will stay looking good for a long time.  Doug did a few little structural repairs and now it is as good as new!


Saturday, December 14, 2013

Framing Fun


It's arts and crafts time here in Foam Core Fantasyland!  I figured I might as well do something to make my house look more like a home while I'm waiting for basic things like window and door frames, baseboards, doorknobs, etc. to happen.  I discovered that hanging pictures is very therapeutic and makes the house look a lot more "done" even with all the ragged wallboard edges everywhere.  Sometimes you have to put the cart before the horse I guess.

I'd previously had some fun adding squares of moulding to some rather plain doors, which really perked them up quite a bit.  So I decided to try the same thing with some plain picture frames from Michael's.

For my first one, which I did back in January, I glued the moulding around the perimeter and painted it with some black Polyshades that was left over from our desk projects to match the black frame.  Then I smeared Rub'n'Buff all over it and buffed it until it was shiny.  I had to be careful to not get too much of the gold caught in the crevices because that would destroy the effect of the black.  It worked out okay on the frame below.  I used Grecian Gold, which is a browner and less bright color than the bright gold you often see on frames.  I love the way it makes the frame look old, especially with the added moulding.


The picture below is actually a photo of the Renoir painting "By the Seashore" which was printed on a piece of canvas to make it look like a real painting.  Cheesy, I know, but it looks great in our back hallway, especially after I made a frame for it.  I picked up this "painting" at an estate sale - it was in somebody's basement and it was FILTHY!  It only cost me 50 cents.  You can't beat that.  So the frame below is made out of a piece of moulding called "picture frame" and I got it at Home Depot.  I painted it black with the Polyshades and rubbed on the Grecian Gold Rub'n'Buff.  I think you can see where I accidentally got too much caught in the crevices on this frame.


Fast forward to Thanksgiving weekend.  It was too cold to work outside anymore and I had some posters and and a few newly acquired watercolor paintings that I wanted to frame, and it just so happened that Michael's was having a crazy sale on frames - 3 frames for the price of one, plus 25% off your entire purchase.  It was time to make my move and throw myself into getting it all done.  I bought a ton of frames for an unbelievable price, and I've used them all.

I actually wasn't able to get started until a few days later.  It took awhile to plan everything, and once I got started, I didn't want to stop.  So it was a huge marathon of making frames fancier, inserting the pictures, and hanging them up, and it took several days to complete because of the quantity.  I think you could actually do one or two frames all in one day pretty easily.

First I assembled my materials:


I decided to try a different approach this time, so I started by spray-painting several of the big frames.  I wouldn't recommend doing this indoors, and after getting some residual paint spray on my face and in my mouth I WOULD definitely recommend wearing a dust mask and goggles.  I was in too much of a hurry to fool with that though.  I brought them inside to dry (in my living room) because it was so cold outside.

I used a Rustoleum "paint and primer in one" product in a hammered finish in a greenish silvery gold color called "Rosemary" for two of the frames, and did two more in a more normal gold color.  I like the hammered finish because it has some color variation and leaves an interesting textured finish for the next things I was planning to do.


This time, instead of having a black base, I decided to use the Polyshades to get a glazed effect.  I discovered that you must wipe it off immediately because it dries really fast.  I like the way some of the black got caught in the texture of the spray paint, in addition to the crevices.  I didn't move fast enough on this first one so more black paint was left behind than I actually wanted.


I didn't have to add mouldings to these frames because they already had a nice shape.  After the spray painting and the glazing with Polyshades, I brightened them up with some Rub'n'Buff in "Goldleaf" which I thought would look better with the greenish yellow walls in my living room.

My friend Jennifer's mother gave me those beautiful watercolors this past summer.  She had inherited a ton of paintings, many more than she could do anything with, and I am really enjoying them now that they are up.  They look perfect in the room and I like knowing where they came from.  Thank you Edna!  I was very happy to find a frame size that worked without a mat, because I think a mat would detract from these particular paintings.


For the next painting I wanted to use a plain black frame with some moulding around the outside, so first it was cut and glued on.  I got the moulding at Home Depot for less than ten dollars - it might have been five.


Then I spray painted it with the Rosemary colored hammered Rustoleum.


And then I smeared and wiped the black Polyshades in the cracks


After that I decided it needed to be browner to complement the trees in the painting, so I used Grecian Gold Rub'n'Buff.


And then I put the picture in and hung it in my bathroom where it perfectly matches the wall.  The lighting caused this picture to look weirdly bright. The walls and the painting are actually a much softer and lighter version of the color you see below.


The next big thing to frame was a poster that I picked up at the National Gallery of Art earlier this year.  I decided to use a tiny beaded moulding to go around the outside of this one.


So here it is, spray painted, glazed with black, Rub'n'buffed, and ready to go.


And now it's hanging in my foyer.  And yes that is a well used bass flight case, also in my foyer because the garage is packed too full of Doug's stuff for it to fit in there.  Needless to say, there are no cars in the garage either.  And yes, that is a raw edge of wallboard on the side of this photo, typical of what you'll see throughout our house.  But there are now lots of pretty pictures on the walls so who cares, right?


I think it's important to have a "fun" bathroom, so I have a tiny powder room that is packed full of framed old cat-themed sheet music and some music-themed pictures from the book "Pre-Raphaelite Cats" by Susan Herbert.  I go (and "go") in that room when I need a laugh.


I bought this framed print on the Eastern shore.  It was old and decripid.  I cleaned it up and replaced the paper on the back, which was DISGUSTING and gave the frame a little dab of Grecian Gold.  I think I've seen this picture in the National Gallery of Art but I don't know what the name of it is.


I bought this print for $3.00 last summer, thinking I would use the frame for a different picture and just toss the print because it was in really horrible shape.  But then I decided that I really liked the print, so I painted the frame and got a mat cut for it.  It looks a million times better now.


Last year Doug had a cruise gig and I got to go along, which was great, because I got to live in the lap of luxury on the same ship where I had formerly worked as a crew musician.  So I took full advantage of all of the various activities, one of which was a daily afternoon art class.  It was really fun, and I even talked Doug into coming with me one of the days.  This is what he painted.  I smile whenever I see it, thinking about him doing that art class with me because that's not really his thing at all.

I had a leftover mat that came with a frame I had used for something else.  It has "fancy" metallic plastic beading going around it, so I took a cheap frame, mixed some gold and silver Rub'n'Buff together in a cup to get a color that matches the pale gold beading, and here's how it came out:


So there are all kinds of different ways to get a pleasant variety of framing effects, without spending a fortune on it.  That Rub'n'Buff is amazing stuff!

Sunday, December 8, 2013

Fall Projects 2013


WARNING:  If I sound cranky, it's because I'm exhausted.  This is a blog - an online diary where I pour out my innermost thoughts for all to read, so I am generously sharing all of my house-related innermost thoughts with all of you now.  I hope you at least feel lucky you're not me, hahaha.  And on a more cheerful note, I'm actually looking forward to my least favorite time of year - winter, because it'll be too cold to work out in the yard for a few short months.

"So......how's the house coming along?"  That's the question that people who perhaps get some sort of sadistic pleasure out of seeing my personna immediately transform from moderately cheerful to bitter and depressed seem to like to ask me.  I know some of them don't mean it, but the same ones always ask, so what am I to think?  Okay, now that I've gotten that out of my system, nothing significant beside getting gutters has happened in the 3+ years since we've been back in our house.  We are still without baseboards and window and door trim throughout the majority of the house.  Those things have not been worked on at all.

I have been focusing my energy on the outside of the house because it's less expensive and a better match for my skill set.  Eventually I might have to break down and learn how to do finish carpentry and finish destroying my hands, knees, and back that way, but for now I am going to enjoy damaging my poor fragile self with activities that take place out in the fresh air and sunshine.

Sometime in August, I gave up on the weeds on the liriope hill and decided that the peeling front steps were starting to be a much greater source of embarassment, so I redirected my energy towards getting them painted.  Now these peeling risers were supposed to have been covered with Azek a long time ago so that they would never need to be painted.  That was the plan.  I don't know why that didn't happen.

Anyway, with that in mind (them being covered with Azek) I figured that a coating of primer would be sufficient until the Azek happened, supposedly within a few weeks at the most, especially since they were primed and ready to go, right?  So five years later the primer-only coating is peeling, and it looks horrible.  If I'd done a topcoat, which would have been wasteful considering the imminent covering of the risers with Azek, there would be no peeling paint for at least another few years.

So as I get down to work scraping it down to bare wood in preparation for painting it right this time, somebody says to me "Maybe we can put the Azek on there this fall."  Maybe, as in yeah, right.  So I said "I'm just going to paint it so that it doesn't look ugly any more and you can take as much time as you need to put the Azek on and I won't have to worry about when you're going to do it, and in the meantime the steps will look nice instead of ugly."

I am now completely tired of this topic.  The steps are painted and they look great, at least from the front.  Doug was extremely helpful (probably due to guilt) as the fall progressed and I am once again hopeful that his intentions will become reality next spring.  Here's the before picture, actually the "year before" picture, and I don't have an after picture, because, big deal, they just look like normal painted steps that aren't peeling.


Sometime in there some chatter occured about the eventual under-the-porch lattice.  Sometimes, but not always, the best way to get help from Doug is to ask for advice about something I plan to undertake myself.  I was figuring that we'd just have the same kind of lattice everyone else has, except I wanted the square openings instead of the diamond shaped ones because it would be a better match for our porch trim.  So it comes in 4x8 foot plastic sheets that never need painting and you figure out what shape of frame will work best with the contour of the ground and cut the lattice sheets to fit the frame.

Now previously, sometime during the more than several years I had available to spend time looking forward to eventually having lattice under my porches, I saw a porch somewhere that had wide vertical slats instead of lattice and I thought that looked pretty cool.  But I realized that it would be a lot more work, and they'd have to be painted and maintained, so I decided it would be better to just admire the lattice on that one house and be more practical with mine.  Because what's wrong with having the same kind of lattice that everyone else has?  Normal lattice is perfectly nice.  I'd been wishing I had some good old normal lattice under my porches for years.

So in August I went out of town for a few days with my roommate from college.  Sometimes Doug fixates on some of my not-that-weird ideas and finds a way to make them weirder.  This has happened several times during the course of building our house.   And he seems to enjoy conducting these experiments when I'm away.  This time while I was gone he suddenly decided to present me with his own design, based on what he thought I had in mind, and he included a special little touch of his own.  Apparently he had forgotten, or chose to ignore, the fact that I had bagged the idea of vertical strips and wanted to just have normal lattice.  So surprise surprise, he emails me this picture:


And this one below - look how cute it is with the little picket tops.  Except the strips he got are really skinny and that picket top business is kind of strange looking.  And why in the world is he suddenly so interested in porch lattice when I'm not even there?  But I did appreciate the gesture and was able to successfully (this time) encourage him to follow up on his good intentions.  There was still a lot of waiting involved, but we actually got some significant work done for a change.


So he talked me into the much more labor-intensive, but way cooler looking vertical lattice, instead of the low-maintanence, easy to assemble, plastic stuff.  But I told him that it needed to look the way I wanted it to look, and those pickets needed to be wider and not have pointy tops.

Doug put up some framing and I did an initial calculation of how many of the wider pickets we'd need and started painting them.  And then Doug went on tour so it looked like this for a while:


And now it's time for me to bitch and moan about the cinderblock.  It looks a whole lot better since I had a chance to borrow a power washer this summer and clean all of the disgusting brown mud splash stains off the front of our house that happened as a result of not having gutters for several years.  It's still pretty ugly though.  If the long ago promised stone veneer doesn't happen pretty soon after the last bit of lattice is finished, I AM going to paint it.  It's ugly.

This is the back porch before anything got started.  My friend JoAnn's beautiful hydrangea bush, which got split into four sections, is doing very well, except for the fact that the flowers have switched over to pink in my soil.


I bought a bag of soil acidifier but I haven't gotten around to using it yet.  I don't really want to mess with nature too much, but I DO want those hydrangeas to be blue again, so I'm kind of torn.  Maybe I'll sprinkle some of this stuff around them the next time it's warm and see what happens.


So back to the pickets - he put up the supports for the eventual pickets.  Meanwhile I spent all of my spare time painting and painting and painting and painting.  It was unbelievably tedious and took absolutely forever.

Doug actually ended up doing all of the cutting and attaching.  But that only took about a quarter of the time the painting took.  And then I had to wait for the paint to dry so that I could put on another coat, and another - one coat of primer and two top coats.

Since I had time to kill in between coats of paint I decided to paint the hideously ugly charred bookcase that had been in the fire.  It was the only other piece of furniture besides our dining room table that wasn't completely destroyed.  I don't know why Doug saved this bookcase - it was a homemade yardsale bookcase and it was all burned and filthy, but the structure of the wood was still there, so I guess he figured it was worth saving.  It's been sitting out on the back porch with all of the other junk we don't need.  Anyway, between the three coats of paint and the many batches of pickets, I managed to get it painted and it's all clean and white and shiny now.  You'd never know that it was once in a fire.  It's in the house now, and it's MINE.

Our back porch stretches for most of the length of the back of our house, so towards the top of the hill there were many short pieces to cut.  This section reminded me of a marimba, especially with the unpainted pieces.  I did all of the initial painting while they weren't attached, so that the coverage would be thorough.  Doug was just checking to make sure all the lengths are correct before he took them down to be painted.


Finally, you can see the finished product in the back.  Well almost - hopefully we'll do the sides in the spring.  But in the meantime I am thrilled at how this turned out.  It's a nice clean look - and not nearly as fussy as the regular lattice would have been.


There was lots more time to kill in between coats of paint after I got that bookcase painted.  It's always a problem when you're outside, all dirty and sweaty, with maybe some partially dried paint in unknown places on your paint-spattered painting clothes.  I can't bring myself to go inside and sit down and potentially mess up my house with dirty, sweaty, wet paint-spattered clothes, so it makes sense to keep painting other things while waiting for the main stuff to dry.

So next up was another item that Doug had saved.  He saves EVERTHING.  Originally this old cabinet was in the laundry room of our old house before we started the addition.  Then it was hanging out in the basement, serving no purpose whatsoever when the fire happened.  Of course it didn't get tossed.  So I decided that it would be really nice to have a cabinet to store all of the smaller gardening stuff in.  Eventually I would like my back porch to actually be attractive instead of ugly and trashy.  So I painted it the same color as the back door, and now I can hide all of that gardening clutter inside it.  WIN!


It started getting to be too cold at night to leave it outside to dry between coats, so I ended up putting some tarps down in the living room and painting part of it inside.


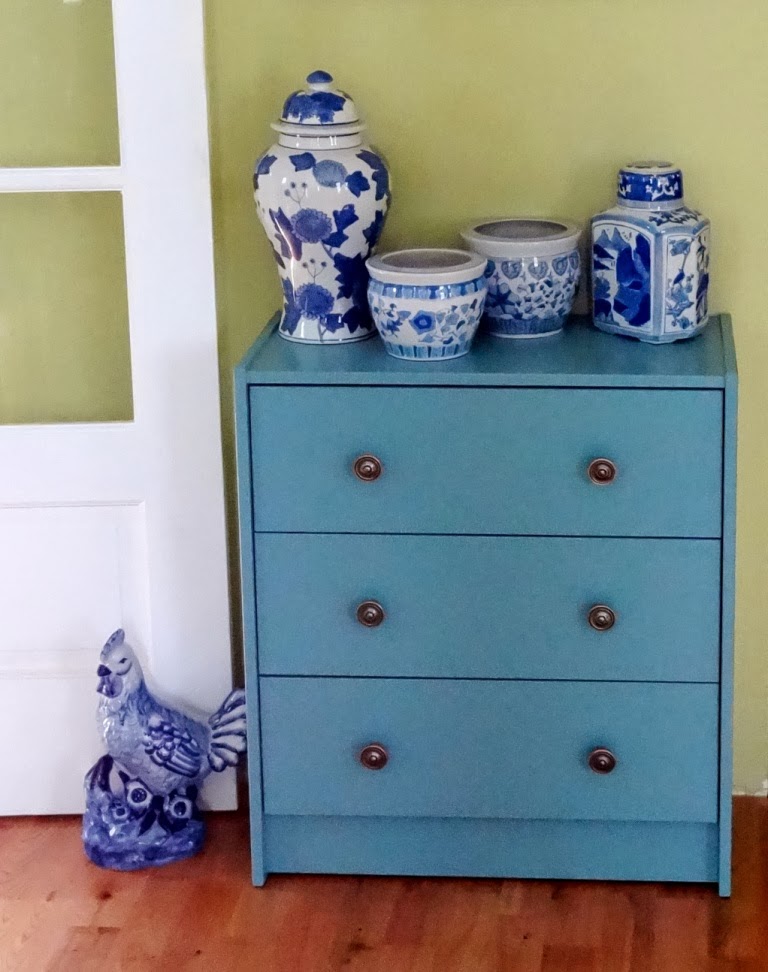
I had time for one last little painting project in between the pickets.  This little chest of drawers was in the as-is section of IKEA.  I paid a grand total of $17.00 for it.  It's all wood except for the masonite drawer bottoms.  I put new knobs on it and painted it blue and now it looks cute.