Wednesday, August 30, 2006

All that Remains....

When they finished tearing down our house and finished hauling it all away we both felt kind of empty and yet also very relieved. It had been difficult to see our house in such a state of disrepair for well over a year.

But now we can finally begin to move on.

This is when they were beginning to fill in the former basement.

Our house is smaller but our front yard is bigger.

They left a big trench in front of the house so that Doug could do the parging and then apply the tar and plastic sheeting all the way down the front foundation wall. Then he added a drainage system. Thanks to all of this we should never have a wet basement.

This new, smaller version of our house does not look so good just yet. It is rather unattractive and a little sad without any windows in the front.
Maybe we should plant some grass now.

Wednesday, August 16, 2006

A Few More Videos

In case you just can't get enough of these, here are a few more. Certain people might find these entertaining, or even interesting. And if you don't watch them, you'll never know what you've missed!

Here's one taken from pretty close in:


Doesn't this look like a giant chicken?
Watch him pecking away at our house.


this one even has some inane dialog

Some Entertaining House Demolition Videos

These are fun to watch I guess, especially the second one.

PULLING DOWN THE BASEMENT WALL

THROWING CHUNKS OF CEMENT AROUND

Tuesday, August 15, 2006

VIDEOS!!! WATCH OUR HOUSE BEING DEMOLISHED

As we were watching our house being torn apart I suddenly decided that it was time to learn how to work the video thing on my camera. It wasn't that hard and I wish I'd checked it out sooner. It definitely made watching the permanent destruction of my house more "fun" as in: Well my house is being destroyed today but at least I 've learned how to make videos on my camera now. Great. After I made a few, Doug figured out how to do videos on his camera too, so I had a lot to choose from.

Loading Debris Into the Truck

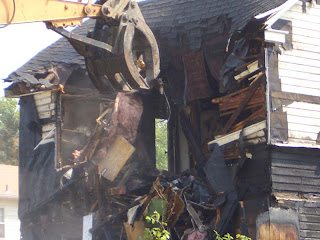
Smashing Up the House Some More

House Demolition Photos

PHOTOS OF OUR HOUSE BEING BULLDOZED on AUGUST 14th

Here goes....


A small crowd gathered to watch.


Smashing up the front


Smashing up the roof


And that's all that's left of it for today

Monday, August 14, 2006

Another Sad Day....

Today is the day that our house is going away forever

I took some final pictures of our house in its current decrepit condition because it is our last chance to see the house we lived in for our entire marriage up until the fire. So this is it, I guess.

Goodbye House...


Goodbye Bedroom and Living Room.....


Goodbye Melted Kitchen....


Goodbye Green Bathroom.....


And this is the last bouquet that I'll
ever get from my beautiful snowball bush....


GOODBYE OLD HOUSE.........


Wednesday, August 9, 2006

Installing the Upstairs Wall

We finally installed the foam core panels into the remaining open front wall surface on the second floor. This was the trickiest thing we've had to do so far. The panels had to be cut and assembled with extreme accuracy and in a very definite order for it all to work. It did work, but it felt kind of like climbing a cliff - scary, and once you start you have to keep going no matter what. And those damn panels are HEAVY!

Here is the center top gable section just before it was pushed into place. This was taken on a cell phone and the lighting wasn't so great. We put in a lot of really late nights working on this - because it was cooler at night. The horizontal thing going across the middle of the picture is a collar tie.


Here I am exhibiting my Herculean strength, pushing that center panel into place. Besides the weight, there was the also the friction of the splines. But the wet glue made a nice lubricant, so pushing it up wasn't as hard as it might have been. hmmm.... Then I had to hold it in place while Doug nailed it with his big strong nail gun.


And now I am inserting the splines into the bottom piece, this time after it was installed because that was an easier way to assemble it on this piece. There is going to be a window in the middle part so we'll just leave that section open for now.

Okay, now I really need a vacation. Scotland here we come!

Tuesday, August 8, 2006

Preparing the Foam Core Panels for Installation

Here is the melting device that we use to remove the foam so that we can insert the panels over the awaiting 2x6s. It is a heating element that is sized to fit in the foam section between the two layers of OSB. The foam needs to be taken down to a certain level so that the 2x6s will fit exactly between the OSB layers. So instead of cutting the foam out, we are melting it out. The cross piece on the heating element adjusts to accomodate the exact depth of the 2x6.


Somebody commented that our house smells like a crystal meth lab after we've been melting foam. So I want to know how would they even know that? Notice the happy expression accompanying the lack of gas mask.
BRAIN DAMAGE ALERT!!!


The foam is cleaned out and we are ready for insertion.
oooh, that sounds dirty....

Monday, August 7, 2006

Almost Ready to Install the Front Wall

Doug is so happy about having finally finished sawing the house apart. He stands proudly by the light-emitting gap that he created with his mighty saw.


We've put in the 2x6s around the perimeter of the 2nd floor and attic. They are now ready to receive the panels.


Here is the collar tie system that Doug came up with back in 1995 for the roof structure. It's probably overkill, but it works and more importantly, the structural engineer passed it.


This is the final shot of the exterior wall of the old house, which thankfully kept the fire from spreading into the addition. We are putting up the new wall right next to it so soon it will no longer be visible. It's weird way of doing it but it's also the only way, and we are pretty sure it will work.

Sunday, August 6, 2006

Cutting the House in Half

My former music room was completely filled with panels just a week ago. Now there are only a few left since most of them have been used to build the new front wall of the house.


Doug used a variety of saws to cut the old part of the house away from the new part so that the new part would not be damaged when we tore the old part down. He cut around the entire house, through all of the walls and the roof. He had to cut from the inside and from the outside to get all the way through the walls safely. He use a couple of different circular saws and I think at least one reciprocating saw died during this process.


It took close to a week to cut through everything but we ended up with a really nice one inch gap between the two sections of the house. Here is a close up shot of the gap. It's a rather scenic gap, as gaps go, don't you think? That basketball hoop is in our neighbors' front yard! I wish we'd been able to get Maggie into the shot.

Saturday, August 5, 2006

THE BEST NEIGHBORS EVER!!!

When we lost our home because of the fire, Gerry and Larry, who live next door to us, took us in for an entire week until we found a place to rent. Now they are sharing their electricity with us while we work on our house. We are so lucky to have such kind and wonderful people as neighbors and I hope we will be able to do something really nice for them when we finally get through this mess.
They have a really nice dog too. I always enjoy visiting a little bit with Maggie whenever I go over to plug in our extension cord into the back of their house. Isn't she beautiful? I think she has such a pretty face.

Installing the Floors and Moving the Panels

During the month of July we removed the basement steps and installed the subfloor on the main level, which means that we can now only access the basement from the outside.

After we put in the floor, we installed the new front wall panels on the main level.

Then we used a pulley to lift the panels for the 2nd floor up through the floor joists.


We stored them in "hallway" of the main section of the upstairs, which already had a floor installed.

Once we got all of the panels we needed moved upstairs we put down the subfloor in the open areas that had originally been designated for the stairwell in the former design. We left a little opening around the wooden ladder that we've been using all this time to get to the 2nd floor.

Thursday, August 3, 2006

PREPARING TO TEAR IT DOWN

In order to safely tear down the old part of our house we had to build a new front wall – from the inside. This involved removing the basement stairs, installing a new sub floor over all of the open stairwell areas on both floors, and then installing foam core panels on what was to become the new front surface of the house. All of these procedures were tricky and physically challenging. And it was hot as hell. We put in some really long hours because there was no way to tell how long it would actually take and it needed to be completely finished in time for the scheduled tear-down of the old part of the house.

After the front structure was complete, Doug used a few different types of saws to cut completely through the wall and roof of the old house at the intersection with the addition. The two sections needed to be completely separated before it would be safe to demolish the old house.

In other news, our building plans were approved by the county, but on July 13th we finally realized that we could not afford to have this builder build our house, so we bought the absolutely fantastic plans and paid the additional amount for ending the contract, and for a while we had no idea what we were going to be able to do about getting our house built. Scary times…..

Nevertheless, we took some time off and went to the International Trombone Festival in England and had a wonderful road trip afterwards through England, Wales, and Scotland. We needed the break, both physically and mentally.